Every land has a Jewel. You win it by clearing your first lair in that land. The Jewels are how the game moves forward: each one you hold opens the next metal for crafting, and makes the gear you find, the goods in village stalls and the creatures you face stronger.
The five Jewels
| Land | Jewel | Won by beating |
|---|---|---|
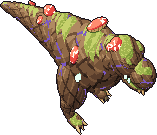
| Woods | Heart of the Old Oak | Silvetus |
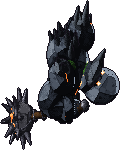
| Rocky Highlands | The Oathfire | Giggos |
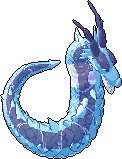
| Tundra | Tear of the Glacier | Nivora |
| Desert | The Dawn Lotus | Fulgoria |
| Haunted Wood | The Mourning Thorn | The Hollow Stag |
You can win the Jewels in any order. Only the first lair you clear in a land gives its Jewel; other lairs in the same land still give their boss's rewards, but not a second Jewel.
Winning a Jewel
When a land's first lair boss falls, the world pauses for a moment. A pillar of light comes down, the Jewel descends to hover over your hood, and the words JEWEL OF (the land) ACQUIRED appear with how many Jewels remain. Then the Jewel flies into its socket on the rim of your map. The banner that follows names what has opened, for example BRONZE RECIPES UNLOCKED.
You can see which Jewels you hold on your map's rim, and on a lair's map mark (HOLDS THE JEWEL OF ... or THE JEWEL OF ... IS YOURS). Winning your first Jewel earns the achievement Jewel of the Wild (see Achievements).
Metal tiers
The number of Jewels you hold, not which ones, decides which metals you can craft with. This opens the next metal's recipes everywhere: weapons and tools at the bench, charms and coats, cooking, and the building ring.
| Jewels held | Metals you can craft |
|---|---|
| 0 | Stone |
| 1 | Stone, Bronze |
| 2 | Up to Iron |
| 3 | Up to Steel |
| 4 or 5 | Everything, including Endurium |
A locked recipe says how many lands you still need to clear a lair in. See Metal Tiers for what each metal does.
What else follows the Jewels
Gear you find
Gear from chests is always of your Jewels' metal or the next one up: with no Jewels, Stone or Bronze; with one, Bronze or Iron; with two, Iron or Steel; with three, Steel or Endurium; with four or more, Endurium alone. Arrows found in chests are also of your Jewels' metal.
Spirit Gems
Which Spirit Gems chests give depends on your Jewels:
| Jewels held | Gem I | Gem II | Gem III |
|---|---|---|---|
| 0 | 100% | none | none |
| 1 | 75% | 25% | none |
| 2 | 60% | 40% | none |
| 3 | 45% | 40% | 15% |
| 4 | 30% | 45% | 25% |
| 5 | 20% | 45% | 35% |
Village stalls
Village stalls sell finer goods as you hold more Jewels. With none, they sell first-tier goods; with one, up to the third tier; with two, up to the fourth; with three or more, all five tiers. Goods of your own Jewels' tier are the most common, and their stock changes when you win a Jewel.
Creatures
- Out in the world at night, creatures have 70% more health and deal 40% more damage for every Jewel you hold.
- In dungeons and lairs, creatures grow with your Jewels as shown below (on top of the dungeon's own difficulty).
- Lair bosses grow much faster: see Lairs.
| Jewels held | Dungeon creature health | Dungeon creature damage |
|---|---|---|
| 0 | x1 | x1 |
| 1 | x1.5 | x1.3 |
| 2 | x2.5 | x1.7 |
| 3 | x4.5 | x2.6 |
| 4 | x7 | x3.8 |
| 5 | x9 | x5 |
Animals
You can keep 5 animals (companions and herd together), and each Jewel makes room for 4 more: up to 25 with all five.
All five Jewels
Holding all five Jewels opens the game's final chapter. The wiki leaves it for you to find.
Tips
- Each Jewel makes the next lair's boss much tougher (see Lairs), so craft gear in your newly opened metal before you go after the next one.
- A Normal lair is the easiest place to win a Jewel. Any lair in the land will do for the first clear.